
The video demonstrates a commercial electrical inspection at a recreational facility, starting at the electric meter and tracing power distribution through the building. This process is consistent across most commercial buildings, but larger or more complex properties, such as this one, require a thorough understanding of the various electrical equipment and how they work together to distribute power throughout the building. Refer to the Commercial Electrical Inspection video library to learn more about safety and reporting procedures, as well as how to inspect the specific equipment covered below. Learn how to perform a commercial electrical inspection and understand power distribution systems in the self paced Commercial Electrical Systems Online Course, included with membership, and receive your certification upon completion
Safety Protocols
Use a non-contact voltage detector before coming in contact with any electrical equipment. Test it on a known live circuit to verify it works, then use it consistently throughout your inspection. If it alerts to voltage, document and move on without physical contact.
Working Space and Dedicated Space
During your preliminary walkthrough, locate the electrical room, determine it’s accessible, and assess clearances around equipment to ensure you’ll be able to safely complete the inspection. The ComSOP requires inspectors to check working space following the 36x30x78 Rule:
- 36 inches front clearance;
- 30 inches side clearance (or equipment width, whichever is greater); and
- 78 inches height clearance.
Dedicated space covers the equipment footprint and extends 6 feet above equipment or to the structural ceiling, whichever is lower. This space must remain free of non-electrical equipment and building systems items. If plumbing or HVAC equipment is installed above electrical equipment within the dedicated space, it must be provided with leak protection, such as drip pans or shields, to prevent moisture from contacting the electrical equipment. See the Working Space and Dedicated Electrical Space image for an illustration of these safety clearance concepts.
Electrical Equipment
Electric Meter Inspection
The inspection begins at the meter, which records electricity usage for billing. Verify adequate working space around the meter and confirm it’s not blocked or behind a locked door. Inaccessible meters should be documented because the utility needs access for maintenance and emergencies.
Note that although the meter and other equipment, such as certain transformers, are utility-owned, inspectors should document their presence and perform a visual condition assessment. You can often determine whether a piece of equipment is utility-owned by checking any labels or placards on the equipment and by identifying where it falls in the flow of electricity through the system, starting at the service.
Main Service Disconnect Inspection
Locate the main service disconnect (building main), which shuts off all building power. It’s the baseline anchor for the electrical system. This is typically in the form of a breaker or lever depending on the piece of equipment.
At the main service disconnect, inspectors complete the following checkpoints:
- Confirm service size (amps)
- Confirm voltage and phase configuration
- Establish what is “upstream” (utility side) vs. “downstream” (building side)
- Compare other panels and equipment to what the building is actually supplied with
Read the labels and document the service amperage rating, voltage configuration, and condition with photographs. Your photo documentation is not only for reporting purposes but also serves as a reference point throughout your inspection.
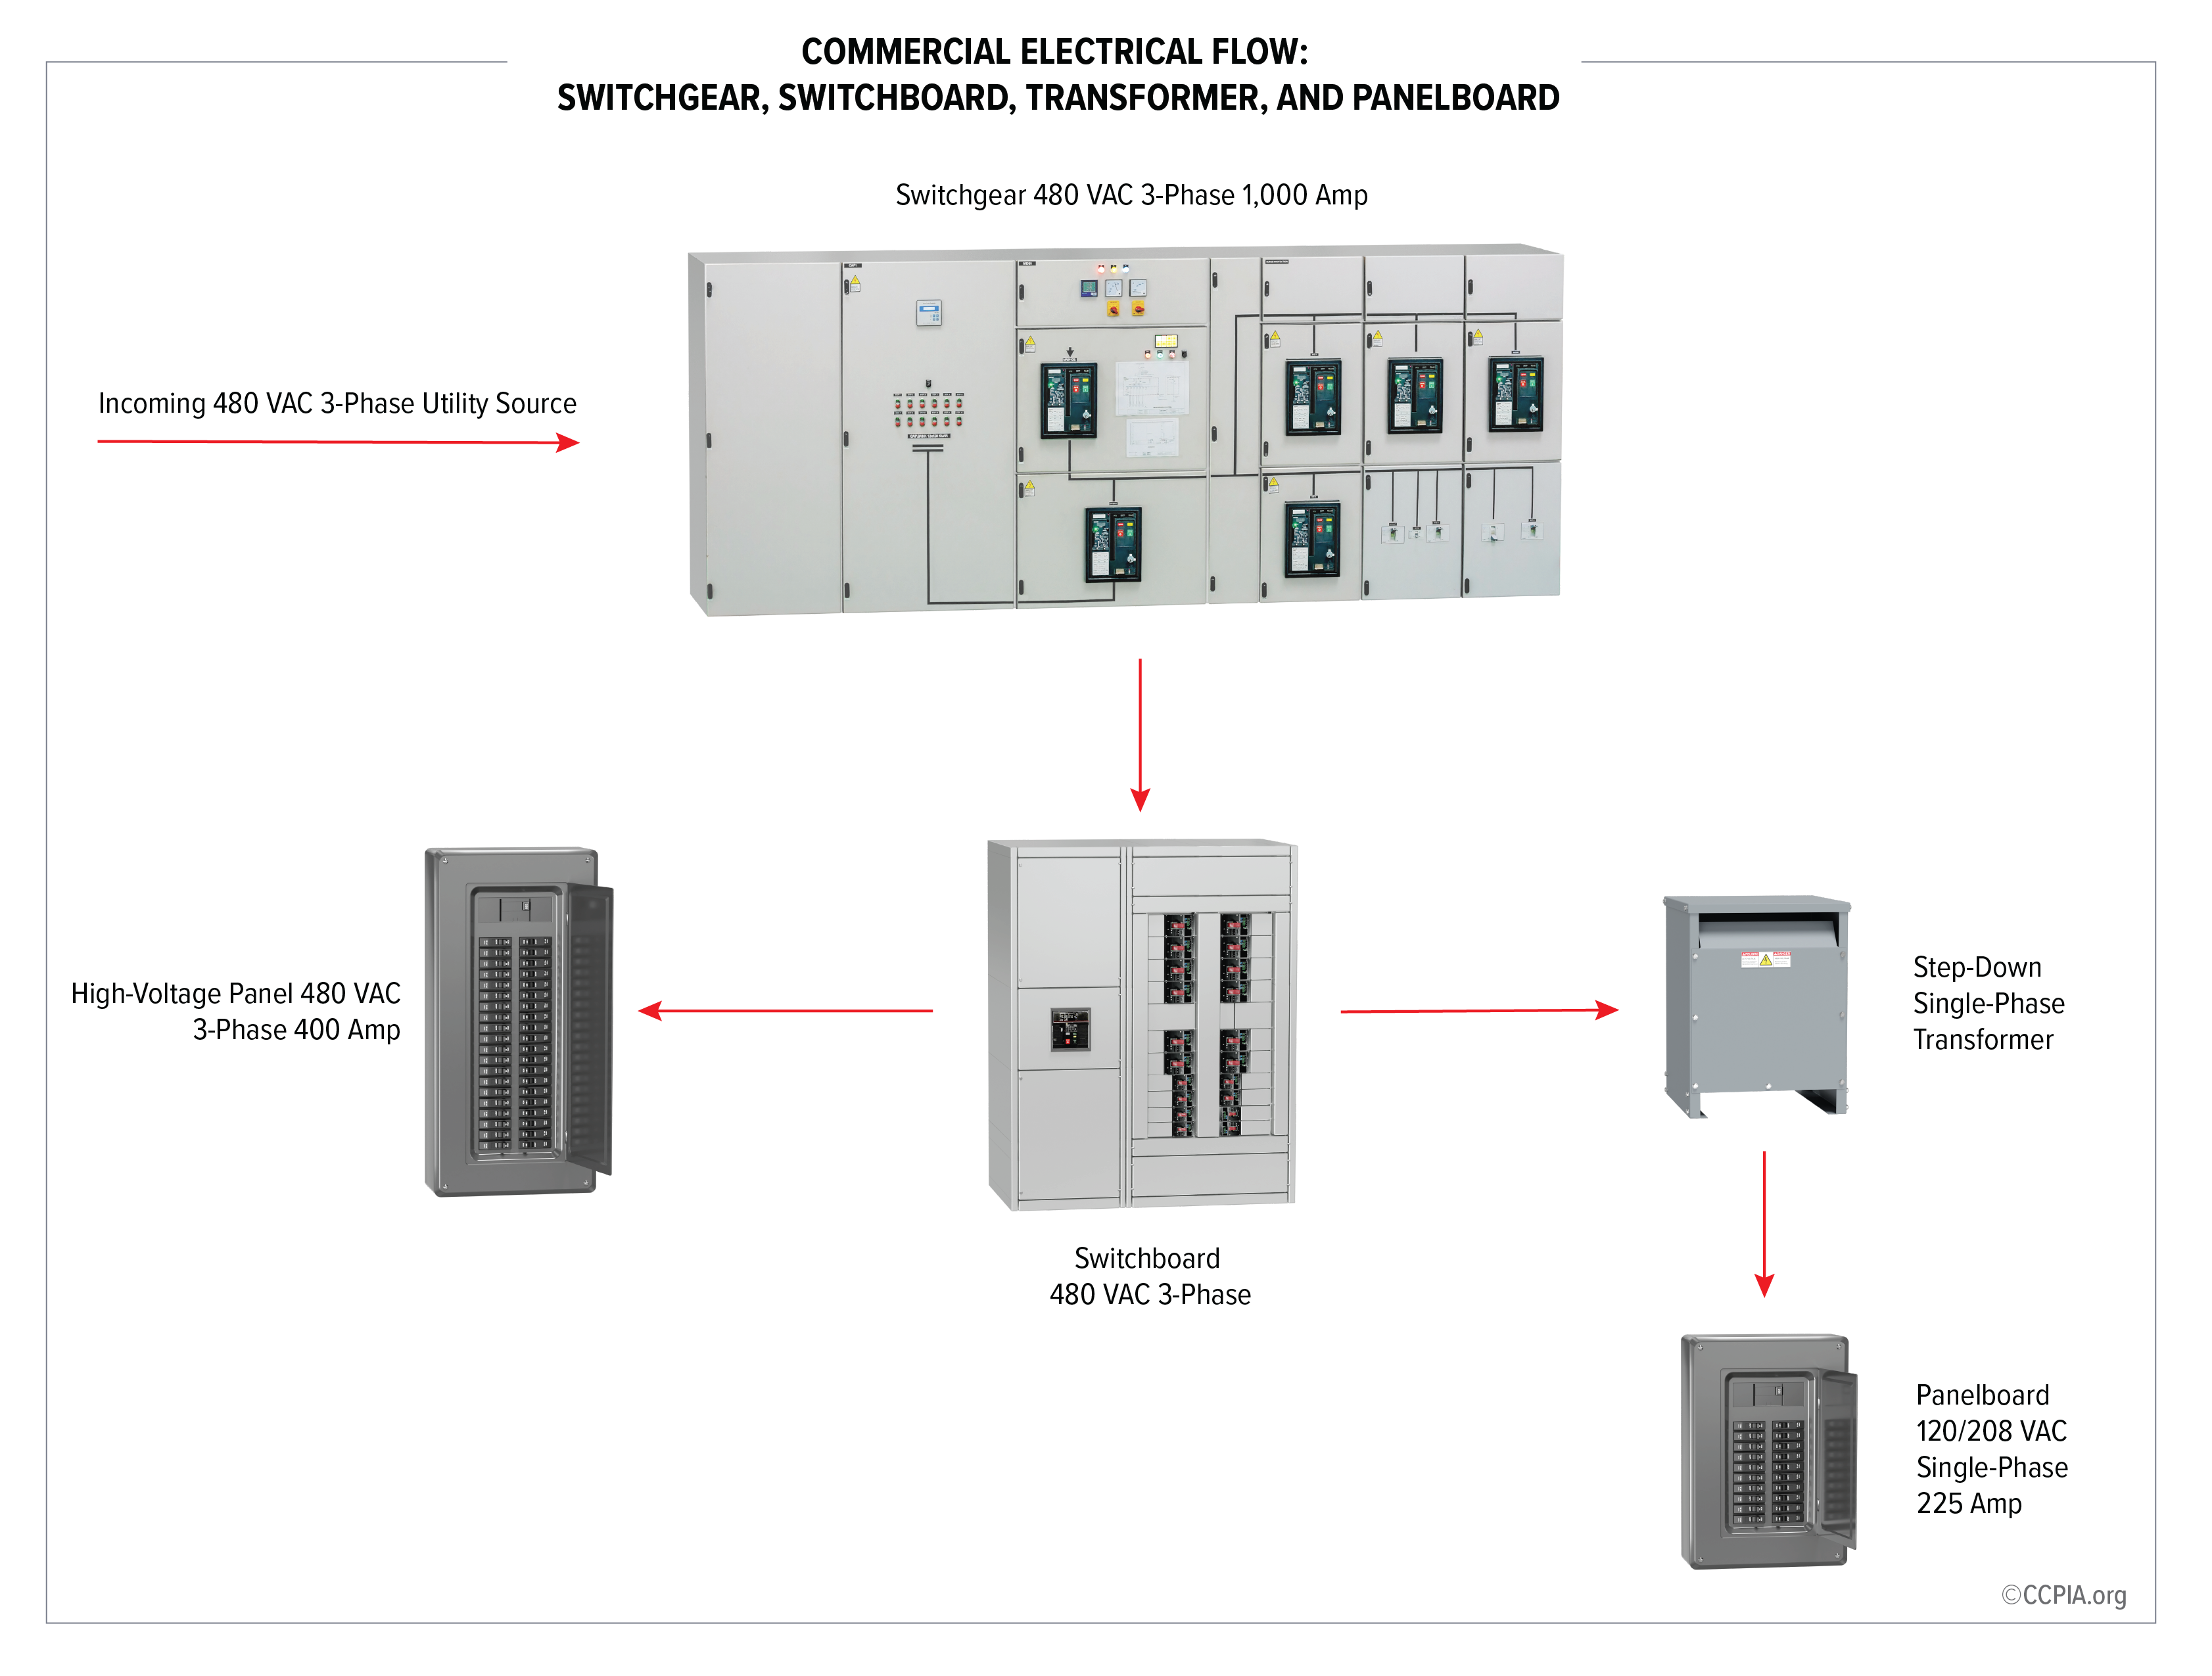
Switchboards and Distribution Inspection
Power flows through switchboards that feed downstream panels. Document labels such as ATS, M1, HDPS, and TE1 to match with corresponding panels downstream. This creates your inspection roadmap.
Verify amperage congruency by ensuring upstream breaker ratings do not exceed downstream panel ratings. For example, a 200-amp breaker supplying a 100-amp panel creates an over-fused condition, where the panel may overheat before the breaker trips, increasing fire risk.
Panel Inspection
Confirm working space meets the 36x30x78 requirements, use your voltage tester, and review panel labeling. In addition to tracing distribution at the switchboard, the panel inspection focuses on verifying the panel’s own rating against the breaker feeding it. For example, if a 200-amp breaker supplies a panel labeled “M1,” the M1 panel should be rated for 200 amps.
As explained in the panel inspection guide, inspectors are not required to remove the dead front cover. When covers remain in place, you can still assess visible conditions, such as open blanks or knockouts, missing circuit directories, physical damage, signs of overheating, rust or corrosion, and absent labeling.
Transformer Inspection
Transformers are used to change AC voltage levels. These can be termed as step-up or step-down, depending upon the need to increase or decrease in the voltage level. For example, transformers are used to step down high voltage (like 480/277V, three-phase) to usable voltage (like 208/120V) for lighting or convenience receptacles. Compare the high- and low-voltage values on the transformer label. If the first is higher, the transformer is stepping the voltage down.
In the video, a transformer is stepping down 480V to 208/120V. High voltage distribution panels (HDP) feed low voltage distribution panels (LDP) through transformers. The LDP shown distributes 208/120 volt, three-phase power throughout the facility. In flood-prone or wet areas, transformers and other electrical equipment may be elevated. Specific elevation requirements vary by jurisdiction and flood zone designation. During your inspection, check overhead for equipment.
Inspector Takeaway
A commercial electrical inspection provides a visual, educated inventory of the electrical distribution system. Trace power from the main disconnect through transformers, switchboards, and panelboards, documenting safety conditions, labeling, and equipment ratings.
Stay systematic by following the same linear path. Prioritize safety by using your voltage detector and assessing working and dedicated spaces. Know your scope, safety procedures, and how to read labels and system designs based on the equipment present. Document thoroughly with photographs and specific findings.
For larger, complex properties, consider using a schedule in your report. It provides a clear list or visual overview of all electrical equipment and can improve report readability. Learn more in Creating and Following an Electrical Report Schedule video. For more information about commercial electrical system inspections, from service entrance to distribution, take the Inspecting Commercial Electrical Systems Online Course. It includes a coursebook, inspection checklists, and you’ll earn a certificate of completion.