
Commercial property inspectors who follow the International Standards of Practice for Inspecting Commercial Properties, known as the ComSOP, know that it emphasizes several critical elements that must be identified during every exterior inspection. One common feature found at most commercial properties is a gas meter.
The gas meter measures the amount of natural gas used by a building. Additionally, it serves as a point of disconnect, enabling the utility company or emergency services to shut off the gas supply to the building, when necessary.
Take the self-paced Inspecting Commercial Building Exteriors Online Course and Inspecting Commercial HVAC Systems Online Course to learn more.
Where to Start?
All gas meters, both residential and commercial, have the same general components. The biggest difference between residential and commercial installations is the size of the meter and the amount of gas that is needed to pass through it.
The first step is identifying the gas meter and documenting its location. It is typically mounted on the exterior of the building, but it may be located in a meter vault, utility room, or other interior space. Many commercial buildings have multiple gas meters installed. The building may have several tenants or systems requiring the need to meter the gas separately for different locations.
Generally, most AHJs require adequate working space around the meter, clearance from combustible materials and ignition sources, and installation in a ventilated location.
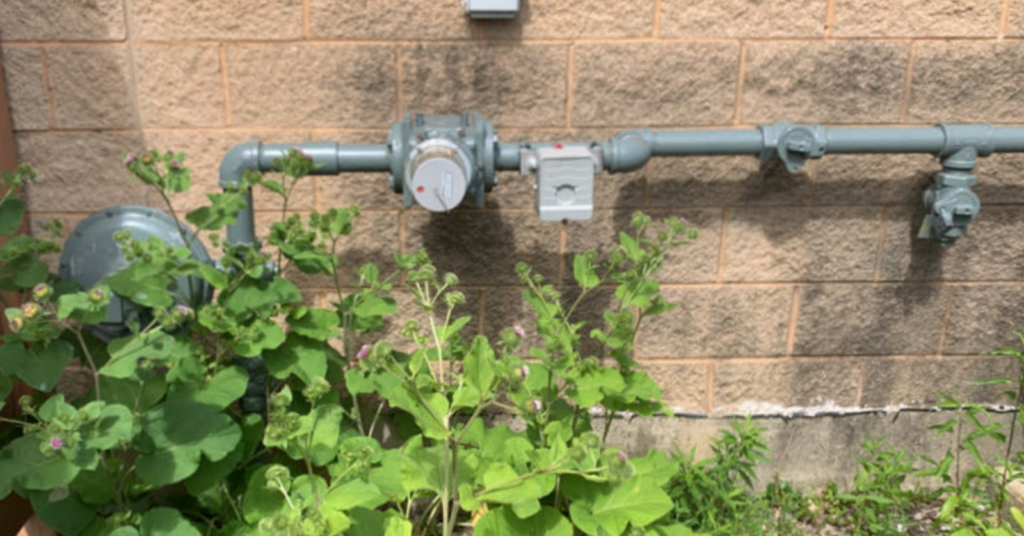
This single commercial gas meter is installed on the exterior of an office building.
Components of Gas Meters
All gas meters are connected to a buried pipe that supplies gas service from the underground utility service. This pipe is typically made of plastic and is surrounded by a tracing wire. The purpose of the tracing wire is to provide a conductive material that the utility company can use to locate the buried pipe even in the deepest soil.
To protect the buried pipe where it exits the soil, it should either be sleeved or attached to a metal pipe. The sleeve or metal pipe guards the gas pipe against abrasion and impact as it exits the soil. Just above the soil, the metal gas pipe should be connected to a lockable shutoff valve. This valve does not have a conventional handle found on a residential installation, so it must be operated using a wrench or other tool. It is lockable to ensure that utility personnel and emergency responders can disconnect the building from the gas supply without the risk of unauthorized reconnection. Inspectors should never operate this valve. Rather, they should simply report whether the gas is shut off at the property.
Most natural gas supplied by the utility is considered low-pressure, typically ranging between 5 and 7 inches of water column pressure. Excessive pressure can lead to issues within the system, including potential malfunctions of gas valves at their various appliances. Installed downstream or directly beyond the shutoff valve is a pressure regulator. This device is designed to release gas from the system if the pressure exceeds its specified limit. The pressure regulator is disk-shaped and consists of a spring and a rubber diaphragm attached to the gas supply. There is a small outlet beneath the diaphragm that has a protective screen.
Beyond the pressure regulator, the gas pipe continues through the meter. In setups with multiple meters, each must be clearly labeled to indicate the area it serves. When a single meter supplies gas to more than one building or tenant, a separate shutoff valve must be provided for each. In multi-tenant buildings with a common piping system, excluding one- and two-family dwellings, individual shutoff valves must be provided for each tenant, and each tenant must have access to their respective valve. Depending on the configuration, the system may have a single pressure regulator, or one for each meter.
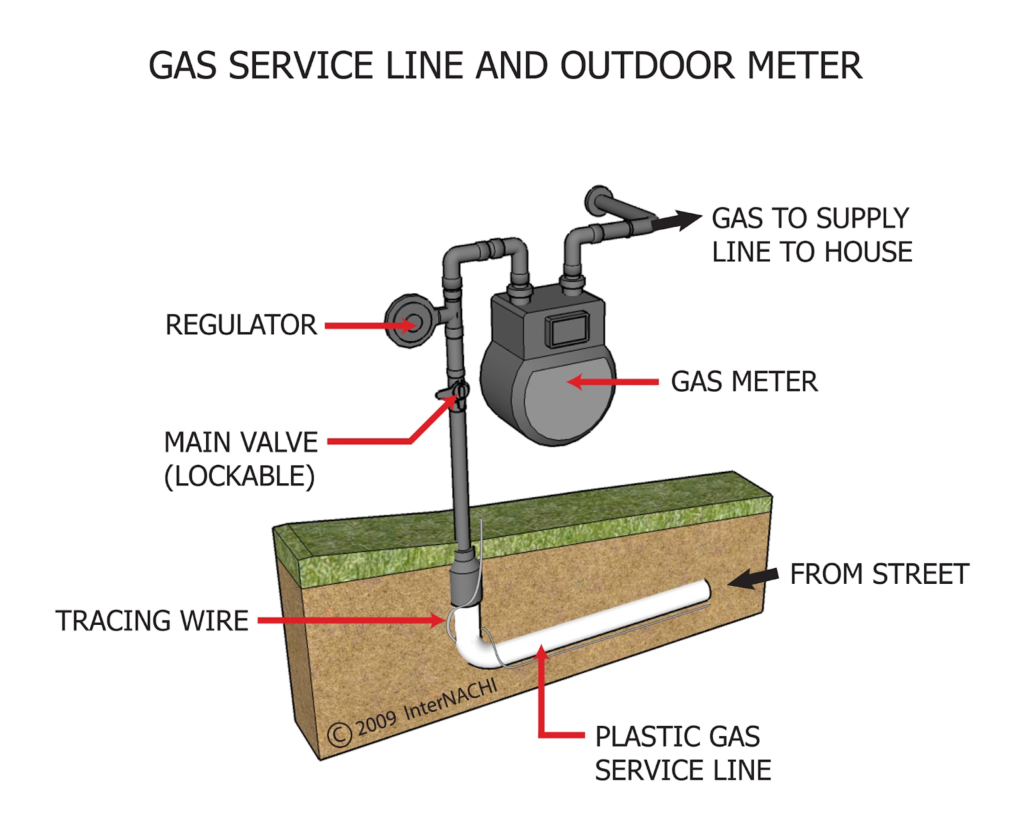
Source: InterNACHI®
Inspecting Gas Meters
The gas meter inspection primarily involves a visual examination; however, some inspectors may employ gas analysis tools and testing equipment to identify leaks. During the inspection, they should verify the presence, visible condition, and secure attachment of all essential components, which include the incoming utility pipe, tracing wire, lockable shutoff valve, pressure regulator, and gas meter.
Inspectors should also assess the general condition of all plumbing and piping in the vicinity. While some rust is not uncommon, excessive rust or corrosion is a concern and should be noted in the inspection report, as this condition may indicate potential leakage.

Excessive rust and corrosion on the gas pipes
Gas pipes can be painted to match the building’s aesthetic, but if there are other plumbing systems nearby, it’s considered best practice for them to remain easily identifiable. Some standards require gas piping to be painted yellow or have a yellow sticker with black lettering placed every 5 feet that reads “Gas Supply.”
If a meter is located in an area where impact is possible, check for a form of protection, like bollards or guard posts, cages, curbing, or guardrails. Common high-risk areas include pedestrian and vehicular travelways, parking areas, drive-throughs, loading docks, and other vehicle ramp locations. Inspectors should evaluate these areas and recommend appropriate protection when deemed necessary. For instance, a barrier curb in a parking lot can provide adequate protection, but an installation adjacent to a loading dock without bollards would not.
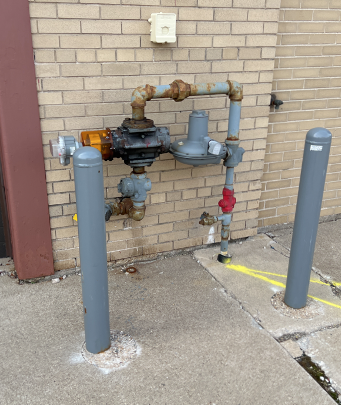
Bollards protect a gas meter installed adjacent to an overhead door.
Gas meters are typically installed in locations that are above ground. They should not be in contact with soil or snow load, as buried meters and regulators may hinder their proper operation. Inspectors should ensure that both the pressure regulator and the bottom of the gas meter are not found buried or have the potential to become buried.

Lack of sufficient protection with snow/ice in contact with the gas meter
Regarding potential gas leaks, inspectors are not explicitly required to identify leaks. However, they can check for gas odors around pipes and connections, as the smell may indicate a leak. If a gas odor is detected, the inspector might use a gas analyzer for further investigation. Another trick of the trade is to apply soapy water to the gas connections. If there is a leak, bubbles will form at the connection, or the analyser might make a noise. While these methods are beyond the scope of the ComSOP, they can be valuable for leak detection. It is important to note that smelling a slight odor of gas at a regulator is not unusual, as this component is designed to release gas when the pressure gets too high.
Soap bubbles are used to locate a gas leak. (Image courtesy of Rod Berning)
The last element of a gas meter inspection is to identify whether multiple meters are labeled. This requirement is often overlooked. Whenever there are multiple meters at the same location, each meter is required to be permanently labeled. This label could be a small metal tag or any other permanent marker.

Multiple meters without permanent labels
Installing gas meters inside buildings was once a common practice, but it posed several challenges. Utility companies found it difficult to access and service these meters, since they needed permission to enter the interior of the building each time. Additionally, gas expelled from the pressure regulator can create a combustion hazard if released indoors. To address this issue, when gas meters are installed inside a building, the pressure regulator should either be located outside of the building, or an extension should be added to the discharge pipe to vent the gas to the exterior. Inspectors need to check the location of the pressure regulator at properties with interior gas meters to ensure that any excess gas is safely discharged outside.

Multiple gas meters are installed in the basement of an apartment building.
The pressure regulator is located on the exterior of the building.
Gas Meter Inspection Checklist — (Download Checklist)
1. Location & Accessibility
- Identify and document the meter’s location (exterior wall, meter vault, utility room, etc.).
- Verify that the meter is not in contact with soil or snow.
- Confirm that adequate working space is available around the meter.
- If located indoors, check for proper ventilation.
2. Incoming Utility Line
- Confirm that the service pipe exiting the ground is sleeved or transitioned to metal (not plastic).
- Note the presence of a tracing wire for underground plastic pipe.
3. Shutoff Valve
- Locate the lockable shutoff valve upstream of the meter.
- Visually confirm that it is secured and in operating position (but do not operate).
- Report if the gas is shut off.
4. Pressure Regulator
- Locate the pressure regulator downstream of the shutoff valve.
- Document condition of the pressure regulator.
5. Meter Condition
- Inspect the gas meter for physical damage, rust, or corrosion.
- Confirm that the meter is not buried or partially buried.
- Ensure that the meter is securely mounted.
6. Piping Condition
- Observe all nearby gas piping for corrosion or physical damage.
- Note whether pipes are painted yellow or labeled with a “Gas Supply” sticker (especially when installed near other plumbing).
7. Impact Protection
- Evaluate for proper protection (i.e., bollards, cages, curbing) if the meter is in a location exposed to vehicle traffic.
- Recommend additional protection if vulnerable.
8. Labeling
- For properties with multiple meters, confirm that each meter is permanently labeled with the area it serves.
- Check that labels are clearly legible.
9. Leak Indicators
- Check for the smell of gas near the meter and connections.
- If using tools beyond the ComSOP’s scope (optional):
- Use a gas analyzer, if available.
- Apply soapy water to fittings and look for bubbles.
Conclusion
Every commercial building that uses natural gas will have a gas meter installed. This meter could be installed at the interior or exterior of the building. Inspectors need to develop a procedure or protocol that includes verifying that the meters are safe from impact and have all of the necessary components present and in good condition. The best practice is to take photos of any missing components and anything that looks damaged, improperly installed, or otherwise not functioning or protected as they should be and include these photos in your report.
Additional Resources for Commercial Property Inspectors: